 how-to
Repairing Old RV Models: Tips for a Solid Rig
Table of Contents
- Start With a Full Condition Assessment Before You Touch Anything
- Safety Checks Before You Start Repairing Old RV Models
- RV Water Damage Repair: Finding and Fixing Leaks
- Prioritize Repairs by Severity and Budget
- Common RV Problems and Repairs in Older Models
- DIY RV Repair Tools and Parts Sourcing
- Model-Year and Construction Differences That Change the Repair
- Cosmetic Updates Come Last: Clean, Polish, and Protect
- When to Call a Professional for Old RV Repair
- Frequently Asked Questions
Last Updated: October 5, 2026
Start With a Full Condition Assessment Before You Touch Anything
Repairing old RV models tips start with one rule: look before you fix. A full condition assessment tells you what is actually broken, what is cosmetic, and what will cost more than the rig is worth.
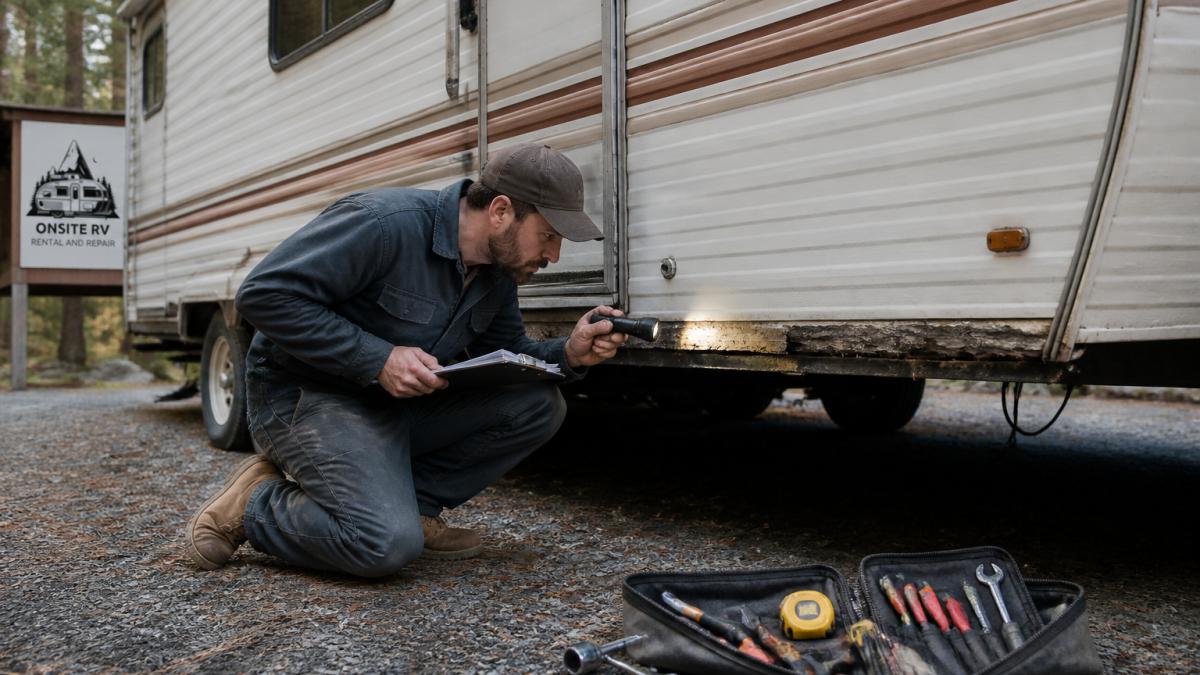
Set aside two hours. Bring a flashlight, a notepad, and a phone camera. Work from the roof down, outside first, then inside.
What to Check on the Exterior
Walk the full perimeter and look at the skin, seams, and openings.
- Roof and seams: Check every lap sealant line and roof vent for cracks.
- Sidewalls: Press along the panels for soft spots or bubbling.
- Windows and doors: Look for cracked sealant and worn gaskets.
- Corner trim: Wiggle it. Loose trim usually means water got behind it.
- Undercarriage: Check for rust, bent frame rails, and hanging wiring.
A common mistake is judging an old RV by its paint. Shine hides nothing underneath.
What to Check Inside
Start in the corners and work toward the middle.
- Ceiling and walls: Look for brown rings, bubbling wallpaper, or a musty smell.
- Floor: Step firmly near the door, bathroom, and kitchen. Soft spots mean rot.
- Cabinets: Open them and check the back panels for stains.
- Appliances: Test the fridge, furnace, water heater, and stove.
- Systems: Run the water pump, check every outlet, and light the stove burners.
Photograph everything. You will build your repair list from these photos.
Safety Checks Before You Start Repairing Old RV Models
Safety comes before repair, every time. Older rigs carry risks that newer ones do not, and skipping this step is how people get hurt.
Do these checks first:
- Propane: Shut the tank valve. Soap-test every connection for leaks.
- Electrical: Disconnect shore power and the battery before touching wiring.
- Battery: Check for cracked cases, corrosion, and swollen cells.
- Roof access: Use a rated ladder on level ground, never a chair.
- Ventilation: Open doors and windows before using any solvent or sealant.
- Fire: Keep an extinguisher within reach when using heat or grinders.
RV Water Damage Repair: Finding and Fixing Leaks
RV water damage repair is the single most important job on an old rig. Water destroys structure, invites mold, and rarely shows itself until the damage is deep. Find the leak, dry the area fully, then rebuild.
How to Trace a Roof Leak
Leaks travel. The stain on your ceiling is often far from the actual entry point.
- Get on the roof and inspect every seam, vent, and skylight.
- Look for cracked sealant, missing screws, and lifted membrane.
- Have a helper spray water on one section at a time while you watch inside.
- Mark the entry point, then let the area dry completely.
- Reseal with the correct product for your roof type.
Treating Mold and Rot
Small mold patches on hard surfaces can be cleaned with a mild detergent and water. Wear a mask and gloves, and ventilate the space.
Rot is different. Soft, crumbly wood must be cut out and replaced, not patched over. If the damage spans a large area or sits near the frame, that is a structural job. Call a professional before you go further.
Prioritize Repairs by Severity and Budget
Not every repair is urgent. Sort your list into three tiers and fund them in order.
| Priority | What It Covers | Why It Comes Here |
|---|---|---|
| Safety first | Propane, brakes, tires, wiring | Protects you and your family |
| Structure second | Leaks, rot, floor, roof | Stops damage from spreading |
| Comfort third | Appliances, fixtures, trim | Improves daily use |
| Cosmetic last | Paint, polish, decals | Looks only, no function |
Fix anything in the top two tiers before you spend a dollar on appearance. A shiny rig with a hidden leak is still a money pit.
Common RV Problems and Repairs in Older Models
Older units fail in predictable patterns, and the difference between a weekend fix and a shop bill usually comes down to whether you can trace a symptom back to its cause. The two groups below, mechanical/chassis and coach systems, behave differently, so diagnose each on its own terms before you buy parts.
Mechanical and Chassis Issues: Symptom-to-Cause Diagnostics
Sitting does as much damage as driving on an old rig. Work through these in order, because a weak battery and old fuel can mimic problems that do not exist.
- Cranks slowly or not at all: Load-test the battery first, then check the terminals for corrosion and the ground strap to the frame. A battery that reads 12.4 V at rest but drops below 10 V under load is done. Replace it before chasing anything else.
- Rough idle or stall after storage: Old gasoline varnishes in the carburetor or injectors. Drain and refill with fresh fuel, replace the fuel filter, and run a cleaner through the tank. If the rig sat more than a year, plan on a fuel-system service.
- Overheating: Check coolant level and condition (brown or gritty coolant means a flush), then the thermostat, then the water pump weep hole for seepage. A radiator that is cool at the bottom and hot at the top is partially plugged.
- Brake pedal soft or sinking: Inspect the master cylinder for fluid loss, then the wheel cylinders and calipers for weeping. Brake fluid absorbs moisture over time, so a fluid flush every few years is normal maintenance on a stored rig.
- Tires: Read the four-digit DOT date code on the sidewall, not the tread depth. Rubber older than roughly seven to ten years should be replaced regardless of appearance, because sidewall cracking and belt separation happen from age, not mileage. Check the spare too.
- Belts and hoses: Squeeze them. A belt that glazes, cracks, or bottoms out in its pulley groove is replaced, not tightened. Hoses that feel hard or spongy are past their service life.
- Wheel bearings and suspension: Jack the axle, spin the wheel, and listen for grinding or feel for play. Grease seals on older trailers dry out and let water in.
Coach Systems: Plumbing, Electrical, Propane, and Appliances
These systems age quietly. Test them under load, not just at rest.
- Plumbing: Pressurize the system with the water pump and watch the pressure gauge or listen for the pump cycling on its own, that means a leak. Check the city-water inlet check valve, the toilet flush valve, and every PEX or polybutylene fitting. Polybutylene (grey, flexible) plumbing in older units becomes brittle and is a common failure point; replace sections rather than patching.
- Electrical: With shore power disconnected, inspect the converter/charger for a burnt smell or swollen capacitors. Test each outlet with a plug-in tester, check the GFCI in the bathroom and kitchen, and look for aluminum branch wiring (common in some 1960s-70s units), which needs a qualified electrician rather than DIY splicing.
- Propane: With the tank valve closed, soap-test every connection. Then open the valve and check the regulator, a regulator that has been exposed to the elements for years often drifts out of spec. Light each appliance and watch the flame: a yellow, lazy flame instead of a blue one points to a blocked orifice or low pressure.
- Appliances: Test the fridge on both 120 V AC and propane, and give it several hours to cool before judging it. Test the furnace by running it through a full cycle and checking that the blower comes on before the burner. Test the water heater on both power sources and check the anode rod, if it is more than half consumed, replace it.
DIY Versus Professional: Where the Line Sits
Most owners can handle batteries, belts, hoses, tires, sealant, and basic plumbing and electrical testing with hand tools. The jobs that should go to a shop are the ones where a mistake is dangerous or expensive: propane system repairs, high-voltage AC wiring, brake hydraulic work, structural framing, and chassis or suspension repairs. If a job requires you to guess at torque specs, wire gauge, or gas pressure, that is your signal to stop.
For planning, treat the repair list as a budget with a contingency. A common pattern is that the first round of repairs reveals a second round once you open a wall or pull a panel. Set aside a buffer on top of your initial estimate, and price the safety-critical items first so a surprise in the cosmetic column does not delay a brake or propane fix.
DIY RV Repair Tools and Parts Sourcing
DIY RV repair tools do not need to be fancy. A basic kit covers most jobs on an older rig.
- Hand tools: Socket set, screwdrivers, pliers, adjustable wrench
- Sealants: Roof lap sealant, butyl tape, and silicone matched to your surface
- Testing: Multimeter, propane leak detector, and a water hose
- Safety: Gloves, eye protection, mask, and rated jack stands
- Cleaning: Mild detergent, scrub brush, and shop rags
Parts are the harder half. Older models often need discontinued components. Measure the old part, photograph it, and search by size rather than by model name. RV salvage yards and specialty suppliers carry parts that dealers no longer stock.
Model-Year and Construction Differences That Change the Repair
Most guides treat "old RV" as one category. It is not. The framing material, roof type, wiring method, and plumbing material in your rig decide which repairs are simple, which are traps, and which parts you can still find. Identify your construction type before you plan the work.
How to Identify What You Have
- Framing: Tap along an interior wall. A dull, solid thud suggests wood framing; a sharper ring or a magnetic test that sticks suggests aluminum or steel. Composite or laminated walls (common from the 2000s on) sound hollow and uniform.
- Roof: Rubber (EPDM) feels like a thick inner tube and is usually black or white. TPO feels like a slightly textured plastic sheet. Fiberglass roofs are hard and smooth. Aluminum roofs are metal with visible seams. The roof type dictates which sealant you use, never mix them.
- Wiring: Look behind an outlet or in the converter panel. Copper branch wiring is standard; aluminum branch wiring appears in some older units and needs different connectors and, often, a professional. Check whether the rig uses a fuse panel or a breaker panel.
- Plumbing: Grey, flexible polybutylene is common in older units and becomes brittle. PEX (usually white, red, or blue) is the modern replacement. Copper is found in some vintage units and can develop pinhole leaks.
What Changes by Era
- Pre-1990s: Predominantly wood framing with rubber or aluminum roofs. Simple systems, few electronics, and repairs that depend on sealing and structure. Rot is the dominant failure mode, and lap sealant and butyl tape are your main tools. Parts are often discontinued, so salvage and specialty suppliers matter more than dealers.
- 1990s to 2000s: Mixed wood and aluminum framing, more complex 12 V and 120 V wiring, and the arrival of control boards in furnaces, fridges, and water heaters. Diagnostics shift from mechanical to electrical, and a multimeter becomes essential.
- 2010s and newer: Aluminum or composite framing, sealed TPO or fiberglass roofs, and appliance control boards that communicate over multiplexed wiring. Repairs depend on electronics and diagnostics, and parts are more model-specific.
Sourcing Parts for Discontinued Models
This is where older rigs get hard. Dealers stock current model-year parts, not 25-year-old components. The workaround is to identify the part by function and dimension rather than by model name.
- Measure and photograph the old part, including mounting holes, thread pitch, and electrical connectors.
- Search by specification, not by RV model, a water pump, furnace sail switch, or roof vent is often a standard component used across many brands.
- Use RV salvage yards for body panels, windows, and trim that are no longer manufactured.
- Check specialty suppliers for vintage-specific seals, decals, and appliance parts.
- Cross-reference appliance model numbers, the fridge or furnace in your rig was likely made by a supplier (Dometic, Norcold, Suburban, Atwood) whose parts catalogs are searchable independently of the RV brand.
Documentation and Post-Repair Verification
Older rigs reward record-keeping. After each repair, note the date, the part used, and the symptom it addressed. Then verify the work before you trust it:
- Water repairs: Re-run the leak test after sealing, and check again after the next rain.
- Electrical: Test every affected circuit under load, not just with a continuity check.
- Propane: Re-soap-test every connection you touched and confirm the appliance flame is blue.
- Mechanical: Take a short test drive or tow before a long trip, and re-check fluid levels and tire pressures afterward.
This record becomes your maintenance history, and it is what a future buyer or a shop will ask for first.
Cosmetic Updates Come Last: Clean, Polish, and Protect
Cosmetic work is the reward, not the starting point. Once the structure is sound and the systems work, then you clean, polish, and protect.
- Wash with a mild detergent and a soft brush.
- Remove old decals with gentle heat.
- Polish the gel coat to bring back shine.
- Wax to seal the surface against sun and rain.
- Reseal seams and trim one more time for protection.
This order matters. Polishing a rig with a hidden leak wastes both your time and your money.
When to Call a Professional for Old RV Repair
Some jobs are not worth the risk. Call a professional when a repair touches propane, high-voltage wiring, structural framing, or the chassis. These systems can hurt you or fail without warning if handled wrong.
At ONSITE RV RENTAL AND REPAIR, we handle diagnostics, plumbing, electrical, propane, appliances, and chassis work on older units, including non-standard models. We offer mobile service that comes to your site and in-shop service at our Port Alberni location, year-round.
You can also check Transport Canada's RV safety guidance for recalls and safety notices on your model, and the RV Industry Association's owner resources for maintenance schedules. For propane work, follow the Technical Standards and Safety Authority's fuel safety rules before you touch a connection.
Frequently Asked Questions
What is the most common repair on an old RV?
Water intrusion tops the list. Seals, roof lap sealant, and window gaskets dry out and crack with age, letting rain in around vents, skylights, and corner trim. Left alone, that moisture rots framing and feeds mold. After leaks, the most frequent jobs are appliance failures (fridge, furnace, water heater), worn suspension and brakes, and plumbing leaks at aging fittings. A yearly seal inspection catches most of these before they turn into structural repairs.
How do you check an old RV for water damage?
Start on the roof and work down. Look for cracked or lifting sealant, soft spots underfoot, and stained ceiling panels. Inside, press on walls around windows and corners for sponginess, and check under cabinets and in storage bays for dark staining or a musty smell. A moisture meter gives you readings without cutting into panels. Pay close attention to the front and rear caps, where seams commonly fail on older units.
Can I repair an old RV myself, or should I hire a professional?
Simple jobs suit DIY: resealing roof seams, replacing a tap, swapping a fuse, or cleaning and repacking wheel bearings. Leave propane work, 120-volt electrical, and structural repairs to a certified technician, since mistakes there are dangerous and can void insurance. If a job needs the roof opened up or the frame reinforced, a professional assessment usually saves money over a failed DIY attempt.
Which repairs should I prioritize when restoring an old RV?
Work in this order: safety first (brakes, tires, propane, electrical), then water damage and leaks, then mechanical systems, and cosmetic updates last. Fixing the shell before the shine prevents new water damage from undoing your work. Budget for the safety and water items first, since they protect both your investment and everyone travelling in the rig.
An old RV is worth saving when the structure is sound and the systems are safe. The trick is knowing which repairs to do yourself and which ones need a pro. ONSITE RV RENTAL AND REPAIR offers year-round diagnostics, mobile service that travels to you, and in-shop repairs for plumbing, electrical, propane, and chassis work. Get started with ONSITE RV RENTAL AND REPAIR and keep your rig safe, reliable, and ready for the road. Call to book an appointment.